
A scrambled cube. Nothing needs to be solved yet.
Yellow centre up, white centre down. You may rotate the cube sideways between edges.
The daisy
Four white edges surround the yellow centre. Ignore the corners, as their colours may differ on your cube.
Drag the cube to inspect it from above.
1. Find the four pieces you need
Find the four edge pieces with a white sticker and ignore the white corners. For now, aim to make a white plus sign around the yellow centre. The other colour on each edge does not need to match a side centre yet.
No single sequence will gather the four white edges from every scramble. Use the cases below and check one edge at a time.
2. Clear the landing position
Before turning a side face to lift a white edge, check the top edge position above that face. If a white petal is already there, turn only U until the position is free. The existing petals stay on top as U turns.
3. Choose the case that matches your cube
| Where is white? | What to do |
|---|---|
| Facing down on a bottom edge | Bring the edge to the bottom-front position with its side facing you (F), clear the top-front position, then do F2. |
| Facing forwards on the middle-right edge (FR) | Clear the top-right position, then do R. |
| Facing front on the middle-left edge (FL) | Clear the top-left position, then do L'. |
| Facing forwards on the top-front or bottom-front edge | Do F to put it into the middle layer, then use the appropriate middle-edge case above. |
| Already facing up | Leave that petal on top and choose another white edge. |
If the white sticker faces sideways, an F turn may dislodge a petal in the top-front position. Use U to move that petal out of the way first. Count the petals again after each insertion to plan one edge at a time.
4. Stop at the daisy
You should see white edges at the top-front, top-right, top-back and top-left positions around the yellow centre. Mixed corner stickers are fine. Keep yellow on top. In the next lesson, you’ll match the side colours and move the petals down to the white centre.
Watch, then try
Work through an example
Start by stepping through one move at a time. This prepared example shows a specific action. Use the lesson’s setup instructions to recognise when to use it on your own scramble.
Watch one worked example
Three white petals are already on top. The last white edge is at the bottom left, with its white sticker facing down. L2 lifts it into the empty top-left position. This completes the daisy, an intermediate step in the solve.
Example grip: Start with yellow on top, blue at the front and red on the right. Follow any written instructions for rotating the whole cube.
0 / 1
Loading 3D cube…
Prepared position · 0 / 1 move
Use Next move to follow the sequence.
Drag to inspect other faces. Use the arrow keys to rotate the view when the cube has keyboard focus.
Copy this exact example on your own cube
Start with a solved 3×3, with yellow on top and blue at the front. Apply the setup moves below from left to right to create the example’s starting position. Keep this example separate from the scramble you are solving throughout the course.
F2 R2 B2Then follow the lesson sequence. If your cube has a different colour scheme, use the relationships between your own colours to identify the equivalent pieces.
Compare the starting position and the result
Drag each cube to inspect its other faces.
Another case: Lift a middle-right white edge
Lift a middle-right white edge
The white sticker on the front-right edge of the middle layer faces you. The top-right position is empty. R lifts the edge into that position to complete the daisy.
Example grip: Start with yellow on top, blue at the front and red on the right. Follow any written instructions for rotating the whole cube.
0 / 1
Loading 3D cube…
Prepared position · 0 / 1 move
Use Next move to follow the sequence.
Drag to inspect other faces. Use the arrow keys to rotate the view when the cube has keyboard focus.
Copy this exact example on your own cube
Start with a solved 3×3, with yellow on top and blue at the front. Apply the setup moves below from left to right to create the example’s starting position. Keep this example separate from the scramble you are solving throughout the course.
F2 R2 B2 L2 R'Then follow the lesson sequence. If your cube has a different colour scheme, use the relationships between your own colours to identify the equivalent pieces.
Compare the starting position and the result
Drag each cube to inspect its other faces.
Another case: Lift a middle-left white edge
Lift a middle-left white edge
The white sticker on the front-left edge of the middle layer faces you. The top-left position is empty. L′ lifts the edge into that position to complete the daisy.
Example grip: Start with yellow on top, blue at the front and red on the right. Follow any written instructions for rotating the whole cube.
0 / 1
Loading 3D cube…
Prepared position · 0 / 1 move
Use Next move to follow the sequence.
Drag to inspect other faces. Use the arrow keys to rotate the view when the cube has keyboard focus.
Copy this exact example on your own cube
Start with a solved 3×3, with yellow on top and blue at the front. Apply the setup moves below from left to right to create the example’s starting position. Keep this example separate from the scramble you are solving throughout the course.
F2 R2 B2 L2 LThen follow the lesson sequence. If your cube has a different colour scheme, use the relationships between your own colours to identify the equivalent pieces.
Compare the starting position and the result
Drag each cube to inspect its other faces.
Explain it to yourself
Check your understanding
Now use your own cube
Your turn
Collect one white petal, then two, then three, then four. Before lifting each new edge, make sure the top edge position it will move into is free.
Open a 3×3 Digital Cube for practiceOpens in a new tab so you can keep this lesson open while you practise. Check for yourself whether you’ve met the lesson goal. The Digital Cube doesn’t assess your result.
If you get stuck
When I add a petal, I lose one I’ve already made.
Before turning the side face, turn U to bring a free top edge position above that side. Keep the edge you’re about to lift in its bottom or middle position while you clear the slot.
Before moving on
Check your result
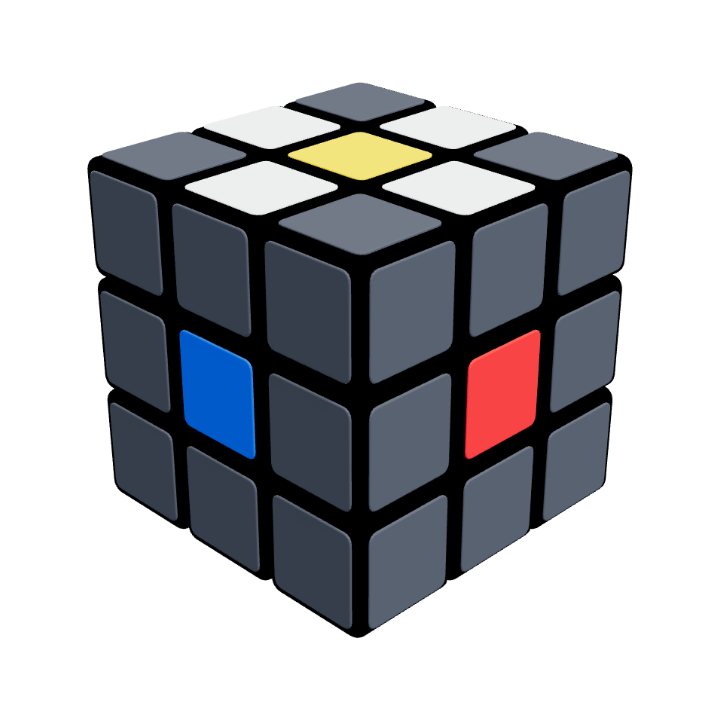
Your cube at this stage
Four white petals
Four white edges surround the yellow centre on top. The side colours do not need to line up yet.
Confirm these on your cube. Watching the animation alone does not complete the lesson.
Tick each item once you can do it yourself.