
All six 3×3 centre blocks are solved.
Keep FL and FR as working positions. Completed groups are stored in U and D.
1. Choose a midge as the reference
The midge is the middle piece of a three-piece edge. Find a midge, note its two colours, then find both wings with the same pair of colours. A finished edge has three matching stickers on each of its two sides.
Wings matching each other with a reversed midge form a checkerboard, not a finished edge. Always include the midge in your check.
2. Bring the pieces into the working band
Use outer turns to put the target midge at FR. Place a matching wing at FL in the upper or lower horizontal slice where a wide turn can carry it to FR. Orient the wing so its colours will match the midge on both the front and right faces.
Use the following sequence to flip the entire FR group.
R U R' F R' F' R
This flips the group as a unit; it does not flip a single wing independently. The example below isolates that movement so you can see how the wing positions and midge orientation change.
3. Add a wing, protect the match, and restore the slice
Use Uw or Uw′ to bring the selected upper-band wing alongside the midge. To work on the lower-band wing, reorient the cube so that band becomes your upper working band, then set up FL and FR again.
After making a useful match, move the group out of the active slice using outer moves, bring an unpaired group into the working slot, and undo the wide turn to restore centres. A two-piece match is worth preserving, but do not count it as a finished edge yet.
Bring the partial pair back into a working position with its matching pieces outside the next active slice, then add its remaining wing. Check all three pieces on both faces before storing the full group.
4. Store eight complete groups
Move finished groups into U and D with outer turns. Keep bringing unpaired groups into the middle working band. If a storage slot already contains a finished group, choose another slot so you do not replace useful work with an unpaired group unnecessarily.
Restoring slices after each operation makes it easier to track the centres. Once four completed edges are above and four below, restore all centre blocks and leave the four unpaired groups in the middle band.
5. Switch methods for the last four
With little storage space left, join–store–restore becomes awkward. The next lesson uses slice–flip–slice-back to exchange selected wings while returning centre rows. Do not disturb a stored full edge merely to free a temporary slot.
Watch, then try
Work through an example
Start by going through the example one move at a time. It shows a specific action from a prepared position. Use the lesson’s setup instructions to recognize when that action applies to your own scramble.
Watch one worked example
Study the FR flip before using it for edge pairing. It flips the entire front-right group and preserves the centre colours. This drill lets you practise changing the group’s orientation before doing a full pairing operation.
Example grip: yellow up · blue front · red right at the start. Follow any written whole-cube rotations.
0 / 7
Loading 3D cube…
Prepared position · 0 / 7 moves
Use Next move to follow the sequence.
Drag to inspect other faces. Use the arrow keys to rotate the view when the cube has focus.
Copy this exact example on your own cube
Start with a solved 5×5, yellow up and blue front. Apply the setup below from left to right. This creates the example’s starting position. Keep this separate from the ongoing scramble you are solving through the course.
R' F R F' R U' R'Then follow the lesson sequence. If your cube’s colour scheme differs, match the piece relationships using your own colours.
Compare the starting position and the result
Drag each cube to inspect its other faces.
Explain it to yourself
Check your understanding
Now use your own cube
Your turn
Choose a midge and find the two wings that share both its colours. Pair each wing with the midge, store the complete three-piece group, and restore the slices. Continue until eight groups are complete.
Open a 5×5 Digital Cube for practiceOpens in a new tab so you can keep this lesson open while you practise. Check for yourself whether you’ve met the lesson goal. The Digital Cube doesn’t grade your work.
If you get stuck
I counted twelve edges but some have mixed stickers.
Count only three-piece groups that match on both faces. A wing–midge pair still needs its third piece.
The correct wings surround a reversed midge.
The checkerboard means the edge is still incomplete. Use the slice–flip–slice-back method in the next lesson. If only one edge remains, check the last-edge parity lesson.
Before moving on
Check your result
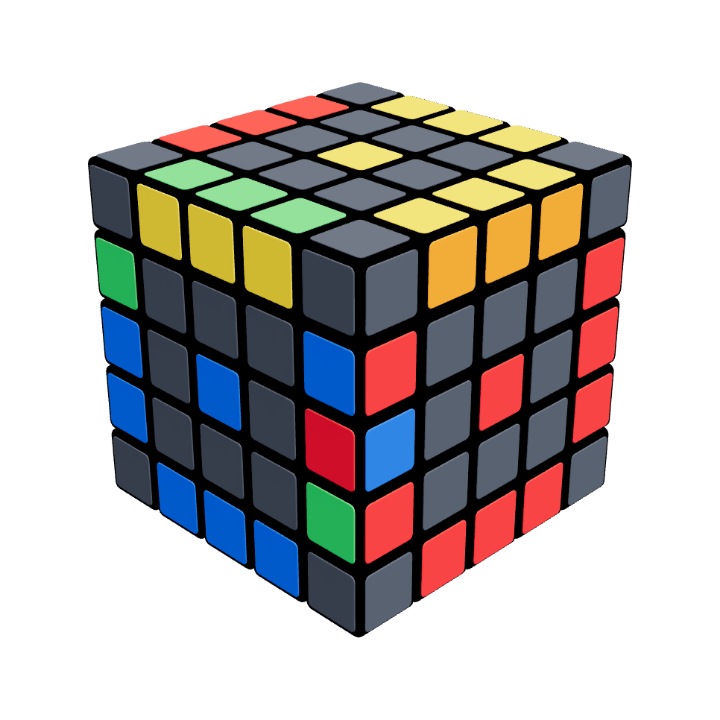
Your cube at this stage
Eight complete edge groups
Four completed groups are stored above and four below. The four vertical edge groups in the middle are still unpaired; all centres are restored.
Confirm these on your cube. Watching the animation alone does not complete the lesson.
Check off each item once you can do it yourself.