A solved white layer, with the bottom row on each side matching its centre.
White down, yellow up. Face the centre that matches the selected edge’s side sticker.
1. Find an edge that belongs in the middle
Look in the top layer for an edge with no yellow. The white edges are already solved in the bottom layer, so the edge you are looking for has two side colours. Ignore edges with yellow for now.
Turn U until the edge’s side-facing colour matches a side centre. Rotate the whole cube sideways to bring that centre to the front. The edge is now at the top-front, forming a vertical line of matching colour on F.
2. Decide left or right
Look at the sticker facing up on that edge. If its colour matches the centre on the right, use the right insertion. If it matches the centre on the left, use the left insertion. Base your choice on the sticker colour, regardless of where the piece appears on the screen.
| Destination | Full insertion sequence |
|---|---|
| Front-right | U R U' R' U' F' U F |
| Front-left | U' L' U L U F U' F' |
Keep the same face at the front for all eight moves. The first part opens the slot. The second inserts the edge and restores the white corner.
3. Check and repeat
The inserted edge should match both neighbouring centres, and the white layer should be restored. Choose another edge without yellow from the top layer, line it up and insert it.
The two worked examples below show the right and left cases separately. Look for the same relationship between colours even if the colours on your front face differ from those in the examples.
4. Eject an edge that is stuck or flipped
If a middle-layer edge is misplaced or flipped, rotate the whole cube to bring its slot to the front-right. Perform the right insertion with any top-layer edge, even one with yellow. This pushes the incorrect edge into the top layer. Find it, line up its side sticker with the matching centre and use the correct insertion to put it back.
If the middle layer is unfinished and only edges with yellow remain on top, an edge is trapped in the middle layer. Use the same recovery step to avoid scrambling the solved layer.
Need a reminder of the move notation?
R right · L left · U top · D bottom · F front · B back. A letter on its own means a 90° clockwise turn when you look directly at that face. A prime mark (′) reverses the turn. A 2 means 180°. Keep the same face at the front throughout an algorithm.
Watch, then try
Work through an example
Start by going through the moves one at a time. The prepared example shows a specific action. Use the lesson’s setup instructions to recognise when to apply it to your own scramble.
Watch one worked example
The top-front edge’s side colour matches F and its top colour matches R. Watch the right insertion move that edge into FR while restoring the white corner.
Starting grip. Yellow up · blue at the front · red on the right. Follow any written instructions for rotating the whole cube.
0 / 8
Loading 3D cube…
Prepared position · 0 / 8 moves
Use Next move to follow the sequence.
Drag to inspect other faces. Use the arrow keys to rotate the view when the cube has focus.
Copy this exact example on your own cube
Start with a solved 3×3 with yellow facing up and blue facing front. Apply the setup moves below from left to right to create the example’s starting position. Keep this example separate from the scramble you are solving as you work through the course.
F' U' F U R U R' U'Then follow the lesson sequence. If your cube’s colour scheme differs, match the piece relationships using your own colours.
Compare the starting position and the result
Drag each cube to inspect its other faces.
Another case: Insert to the left
Insert to the left
The top-front edge’s top colour matches L. The left insertion places it at FL and restores the white layer.
Starting grip. Yellow up · blue at the front · red on the right. Follow any written instructions for rotating the whole cube.
0 / 8
Loading 3D cube…
Prepared position · 0 / 8 moves
Use Next move to follow the sequence.
Drag to inspect other faces. Use the arrow keys to rotate the view when the cube has focus.
Copy this exact example on your own cube
Start with a solved 3×3 with yellow facing up and blue facing front. Apply the setup moves below from left to right to create the example’s starting position. Keep this example separate from the scramble you are solving as you work through the course.
F U F' U' L' U' L UThen follow the lesson sequence. If your cube’s colour scheme differs, match the piece relationships using your own colours.
Compare the starting position and the result
Drag each cube to inspect its other faces.
Explain it to yourself
Check your understanding
Now use your own cube
Your turn
Insert each edge without yellow using the left or right insertion. If every top-layer edge has yellow and the middle layer is still unfinished, eject a misplaced or flipped middle-layer edge and reinsert it.
Open a 3×3 Digital Cube for practiceOpens in a new tab so you can refer to this lesson while you practise. Check for yourself whether you’ve met the lesson goal. The Digital Cube does not grade your work.
If you get stuck
The edge went into the correct slot but is flipped.
Eject the edge using the right insertion. Once it is back in the top layer, align its side sticker with the matching centre again, then use its upward-facing colour to choose the insertion.
Only yellow edges remain on top.
Inspect the middle layer. If it is not solved, eject one of its incorrect edges using the recovery step.
Before moving on
Check your result
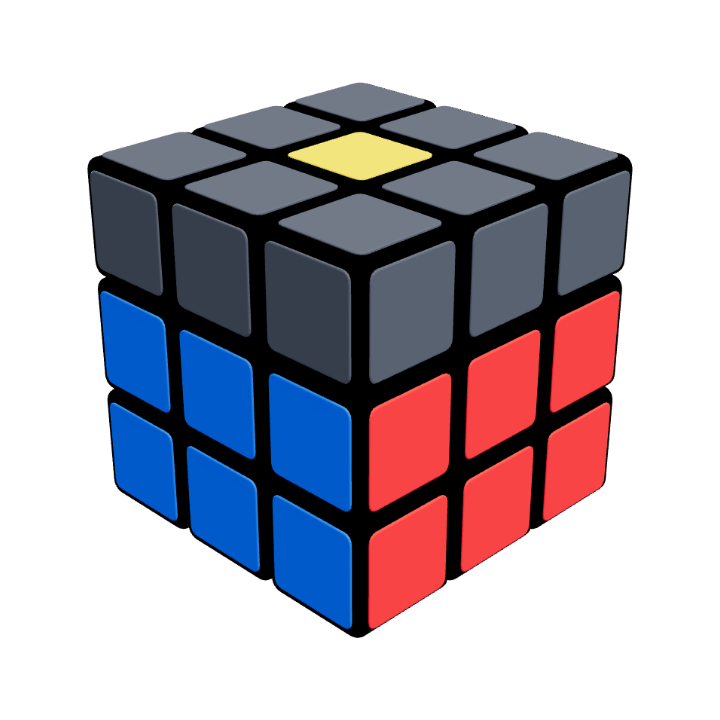
Your cube at this stage
First two layers solved
The bottom two rows of every side match. Only the top layer remains to be solved.
Confirm these on your cube. Watching the animation alone does not complete the lesson.
Tick each item once you can do it yourself.