The white layer and middle layer are complete.
Yellow up. For a line, put yellow edges at left and right. For an L, put them at back and left.
Look straight down at the top. Front is the edge nearest you. Gray stickers are not part of this check.
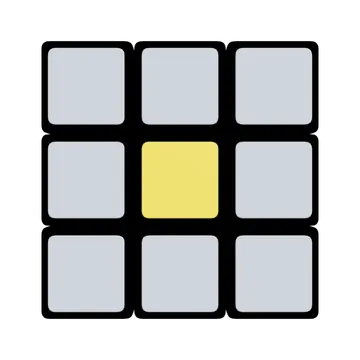
No yellow edges up. Any front.
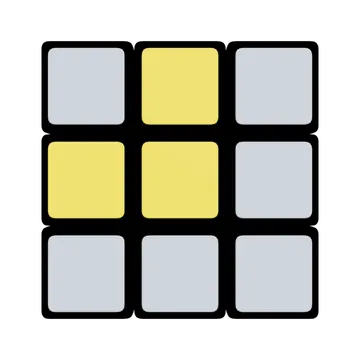
Yellow edges at back and left.
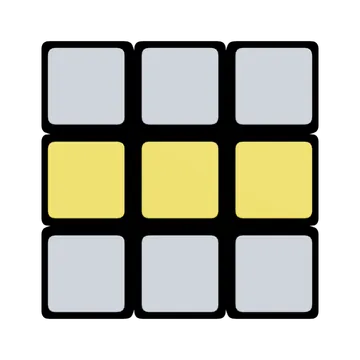
Yellow edges at left and right.
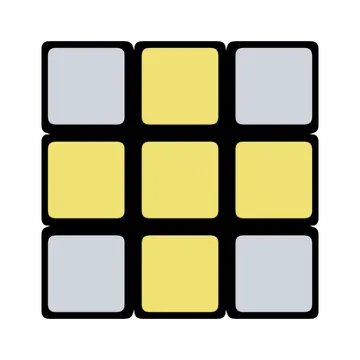
All four edges up. Move on.
1. Read only the four top edges
Ignore the corners, even if they are yellow. Around the yellow center you will see a dot (zero yellow edges up), an L (two adjacent), a line (two opposite), or a cross (all four).
A correctly assembled 3×3 cannot have exactly one or three yellow edges facing up when the first two layers are solved. Recount the edges before assuming the case is unusual.
2. Set up the shape
| Shape | Hold it this way | What happens next |
|---|---|---|
| Dot | Any front, yellow up | The sequence makes an L. Inspect and set up again. |
| L | Yellow edges at back and left | The sequence makes a line. Set that line left–right. |
| Line | Yellow edges at left and right | The sequence makes the cross. |
| Cross | Already finished | Skip this sequence and continue. |
Use U or rotate the whole cube sideways before the sequence to position the shape. Keep the front fixed during the moves.
3. Do the six moves
F R U R' U' F'
Think “front, four-move trigger, front back.” Finish the final F′; that move restores the front layer.
Recount the top yellow edges after every full sequence. A dot takes up to three applications, an L two, and a correctly held line one. Recognition between applications matters more than repeating quickly.
4. Stop when the cross is yellow
The side colors of the yellow edges do not need to match their centers yet. Yellow corners also do not need to face up. Those jobs come later; preserve the first two layers and continue to corner orientation.
Need a reminder of the move notation?
R right · L left · U top · D bottom · F front · B back. A plain letter is 90° clockwise looking directly at that face. An apostrophe (′) reverses it; 2 means 180°. Keep the front fixed during an algorithm.
Watch, then try
Work through an example
Use one move at a time first. This prepared case teaches a specific action; use the lesson’s setup instructions to recognize when it applies to your own scramble.
Watch one worked example
This example starts with a left–right yellow line. Watch the four edge stickers on U; the final F′ restores the lower layers and completes the cross.
Example grip: yellow up · blue front · red right at the start. Follow any written whole-cube rotations.
0 / 6
Loading 3D cube…
Prepared position · 0 / 6 moves
Use Next move to follow the sequence.
Drag to inspect other faces. Arrow keys rotate the view when the cube is focused.
Copy this exact example on your own cube
Start with a solved 3×3, yellow up and blue front. Apply the setup below from left to right. This creates the example’s starting position. Keep this separate from the ongoing scramble you are solving through the course.
F U R U' R' F'Then follow the lesson sequence. If your cube’s color scheme differs, match the piece relationships using your own colors.
Compare the starting position and the result
Drag each cube to inspect its other faces.
Another case: Start with an L
Start with an L
Yellow edges start at back and left. The first six moves make a left–right line; the next six complete the cross. Pause after move 6 and identify the line.
Example grip: yellow up · blue front · red right at the start. Follow any written whole-cube rotations.
0 / 12
Loading 3D cube…
Prepared position · 0 / 12 moves
Use Next move to follow the sequence.
Drag to inspect other faces. Arrow keys rotate the view when the cube is focused.
Copy this exact example on your own cube
Start with a solved 3×3, yellow up and blue front. Apply the setup below from left to right. This creates the example’s starting position. Keep this separate from the ongoing scramble you are solving through the course.
F U R U' R' F' F U R U' R' F'Then follow the lesson sequence. If your cube’s color scheme differs, match the piece relationships using your own colors.
Compare the starting position and the result
Drag each cube to inspect its other faces.
Another case: Start with a dot
Start with a dot
No yellow edges face up at the start. The first six moves make an L; U2 at move 7 places it at back-left. The next six moves make a left–right line, then the final six complete the cross. Pause after moves 7 and 13 to recognize the new case.
Example grip: yellow up · blue front · red right at the start. Follow any written whole-cube rotations.
0 / 19
Loading 3D cube…
Prepared position · 0 / 19 moves
Use Next move to follow the sequence.
Drag to inspect other faces. Arrow keys rotate the view when the cube is focused.
Copy this exact example on your own cube
Start with a solved 3×3, yellow up and blue front. Apply the setup below from left to right. This creates the example’s starting position. Keep this separate from the ongoing scramble you are solving through the course.
F U R U' R' F' F U R U' R' F' U2 F U R U' R' F'Then follow the lesson sequence. If your cube’s color scheme differs, match the piece relationships using your own colors.
Compare the starting position and the result
Drag each cube to inspect its other faces.
Explain it to yourself
Check your understanding
Now use your own cube
Your turn
Count only yellow edges on top. Choose the matching case, perform the sequence, then recognize the new case before repeating.
Open a 3×3 Digital Cube for practiceOpens in a new tab so you can keep this lesson beside your practice. Check the lesson goal yourself; the Digital Cube does not grade it.
If you get stuck
The pattern does not change as expected.
Ignore yellow corners, then reset the shape: L at back-left or line left–right. Make sure you include the closing F′.
I see one or three yellow edges.
Check that the lower layers are solved and count only edge pieces. On 4×4 this can be parity; on a correctly assembled 3×3 it is not a normal case.
Before moving on
Check your result
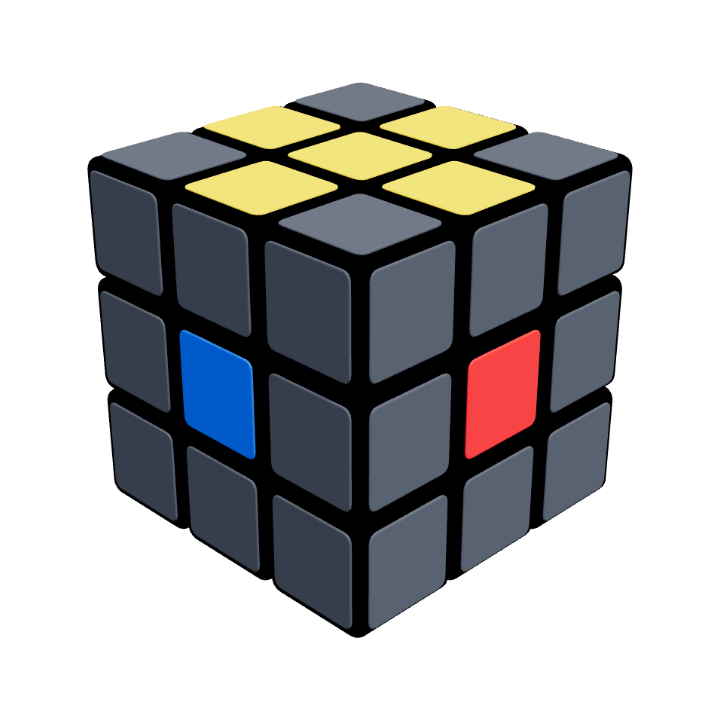
Your cube at this stage
A yellow cross on top
All four yellow edges face up. Yellow corners and the side colors of the top edges may still need work.
Confirm these on your cube. Watching the animation alone does not complete the lesson.
Check every item when you can do it yourself.